Tonight I had no idea what to make, but I had alot of produce that I needed to use up. So, in our family's Italian way, I decided to just make a pasta dish with whatever kept coming to mind. Here's what I ended up with:
Here's the recipe and the instructions of how to put it all together:
1/2 lb. of small pasta
1 cup vegetable broth
1/3 cup white wine
1 garlic - pressed
1/2 large white onion
1-2 tbsp. olive oil
1 15.5 oz can cannellini beans
1 lb. fresh asparagus spears
5 oz. fresh baby spinach leaves
2 fresh tomatoes
1/4 cup of fresh basil leaves left whole
1/2 cup pasta water
Salt & pepper to taste
Pamesan cheese to garnish
I started first by boiling the pasta water and then cooking the pasta. In my very large skillet, I boiled one cup of vegetable broth and I added about 1/3 cup of white wine. I pressed one garlic clove and sliced up half of a large white onion and put it in the broth/wine mixture. Once most of the liquid was evaporated and the onions were tender, I added 1-2 tbsp. of olive oil. To that I added one can of cannellini beans, my cut up asparagus, and a big bunch of baby spinach leaves. Once the spinach was wilted and the asparagus was steamed and bright green, I added 2 tomatoes cut into large chunks and about 1/4 cup of fresh basil leaves that were fresh from our garden. When the tomatoes were heated through, I added about 1/2 cup of my pasta water and the pasta and it was done! Add salt and pepper to taste and you have a very low-fat, delicious meal. Add some parmesan cheese to garnish. All participants of my dinner were very approving, so I would say it was a last minute success!
Then to end our delightful meal, I made Martha's Raspberry Sorbet with fresh whipped cream. There's nothing like it and it was so light and delicious! There's nothing like fresh whipped cream too. You'll love it!
This entire meal was completely last minute just to prove you can eat well in a short amount of time with no planning involved - only once in a while does this actually work!
Thursday, August 19, 2010
Wednesday, August 18, 2010
Summer Fruit Tart
My Aunt came over today to see me, the girls and my Mom before she leaves for France for the month. Lucky Duck! I wanted to make something special, so I made a fruit tart for brunch and served it with tea. It was very good, but as with anything, it wasn't completely perfect. However, I remember Julia Child said that even if something doesn't work exactly right, do not apologize. So, here's my fruit tart saga that started out great, went a bit nuts, but then worked out in the end!
I used the almond tart shell recipe from Woman's Day. I wanted something I didn't have to refrigerate, put weights on, or take a ton of time to make. This recipe was really easy, but I will warn you (as with any tart crust) it is very fragile! Just follow the recipe until you're done making the tart shell. Then cool it in the pan on a wire rack. From there, this is where I fell into some trouble. I took it out of the tart pan and it was working and looking perfect. I then went to place it into a tart serving dish that I was given for my wedding 11 years ago and have never used. It turned out that the tart shell was bigger than the dish and when I placed it in the dish, it just crumbled apart. Every time I touched it, it got worse! The remedy would be to just place it on a plate next time. Live and learn! Seeing as this was 11pm last night, I was not going to make another one. Besides, it was just going to crumble when we cut it anyway. And, thankfully my guests are very understanding, forgiving, and thankful for everything. I knew I was in good hands!
This morning, I put some apricot preserves in a small saucepan with a little bit of water to thin and heated it over med-high heat. Then I brushed the crust with the preserves so that the fruit wouldn't seep through and make it soggy. I put a layer of lemon curd on the bottom and then proceeded to layer my fruit. I used thin sliced peaches, kiwi, strawberries, blueberries, and raspberries. I finished it off by brushing a coat of the apricot preserves over the top of the fruit layer. This gave it a glossy finish and it looked beautiful. Surprisingly, it cut very nicely and each piece came out well. I think between the preserves and the lemon curd it acted as a glue for the crust. Over all it was a success!
And for good measure, I'll throw in a picture of my cuties!
I used the almond tart shell recipe from Woman's Day. I wanted something I didn't have to refrigerate, put weights on, or take a ton of time to make. This recipe was really easy, but I will warn you (as with any tart crust) it is very fragile! Just follow the recipe until you're done making the tart shell. Then cool it in the pan on a wire rack. From there, this is where I fell into some trouble. I took it out of the tart pan and it was working and looking perfect. I then went to place it into a tart serving dish that I was given for my wedding 11 years ago and have never used. It turned out that the tart shell was bigger than the dish and when I placed it in the dish, it just crumbled apart. Every time I touched it, it got worse! The remedy would be to just place it on a plate next time. Live and learn! Seeing as this was 11pm last night, I was not going to make another one. Besides, it was just going to crumble when we cut it anyway. And, thankfully my guests are very understanding, forgiving, and thankful for everything. I knew I was in good hands!
This morning, I put some apricot preserves in a small saucepan with a little bit of water to thin and heated it over med-high heat. Then I brushed the crust with the preserves so that the fruit wouldn't seep through and make it soggy. I put a layer of lemon curd on the bottom and then proceeded to layer my fruit. I used thin sliced peaches, kiwi, strawberries, blueberries, and raspberries. I finished it off by brushing a coat of the apricot preserves over the top of the fruit layer. This gave it a glossy finish and it looked beautiful. Surprisingly, it cut very nicely and each piece came out well. I think between the preserves and the lemon curd it acted as a glue for the crust. Over all it was a success!
And for good measure, I'll throw in a picture of my cuties!
Wednesday, August 11, 2010
What separates the Italians from the "I" -talians
As most of you know I am expecting another baby in December. I have been trying to eat healthy foods, but this last week I just craved something hearty and something to "stick-to-your ribs". I have a recipe for Alfredo Sauce, but I wanted one that was REALLY good. So, I looked up Emeril's recipe on the Food Network.
As I was looking at the comments about it, I came across one that was pretty pretentious, but it caught my eye as it said, "I have enjoyed Fettucine Alfredo in several restaurants throughout Italy, including the original "Alfredo's Ristarante" and... not one of them used cream...." Then it got me wondering, "What do they use?" I then looked up Alfredo's Ristarante in Rome and found the story of the creation of Alfredo Sauce.
Here's the link and the story: Alfredo's Ristarante of Rome "The Original Fettuccine Alfredo was created in 1914 by Alfredo Di Lelio, concocted to tempt the palate of his pregnant wife who had lost her appetite. Alfredo went to his kitchen, mixed egg noodles with the finest parmigiano cheese and butter and created a dish even his wife couldn't resist. The rest is history!" I felt I could really relate with this story.
I went to our local, Italian bakery and got some fresh fettucine (I could have made my own, but didn't quite have that much energy) and some imported proscuitto to add to the dish. (Note: Imported is so much better than the Domestic.) Then I went to the local grocery store and bought fresh, grated Parmigiano cheese and went home to make this meal. Here's the recipe link: Alfredo Sauce Recipe.
I cut up the proscuitto and cooked it and the peas separately because you don't actually cook the sauce. The secret to cooking proscuitto is to not cook it too long because it will dry out and be crunchy. Make sure you keep a careful watch on it. As soon as it's heated through, shut it off! (And, yes, I already knew this and did it right.)
Then I pulsed the room temp. butter and cheese in my food processor and waited for the noodles to be done. Look at how soft and fluffy it is!
Then I mixed it all together and got a great response from my husband and girls. Aubrey wanted 3 bowls and Angelina asked for another helping. Jeremy's response was, "Wow! This is amazing!" I think it was a hit! Look at how nicely it coats the noodles.
In short, this, my friends, is what separates the true Italians from the "I"-talians. (You know the want-to-bes who annoyingly pronouce it "eye"talian!) Who would have thought that there was such a science to a good Alfredo Sauce? Enjoy!
As I was looking at the comments about it, I came across one that was pretty pretentious, but it caught my eye as it said, "I have enjoyed Fettucine Alfredo in several restaurants throughout Italy, including the original "Alfredo's Ristarante" and... not one of them used cream...." Then it got me wondering, "What do they use?" I then looked up Alfredo's Ristarante in Rome and found the story of the creation of Alfredo Sauce.
Here's the link and the story: Alfredo's Ristarante of Rome "The Original Fettuccine Alfredo was created in 1914 by Alfredo Di Lelio, concocted to tempt the palate of his pregnant wife who had lost her appetite. Alfredo went to his kitchen, mixed egg noodles with the finest parmigiano cheese and butter and created a dish even his wife couldn't resist. The rest is history!" I felt I could really relate with this story.
I went to our local, Italian bakery and got some fresh fettucine (I could have made my own, but didn't quite have that much energy) and some imported proscuitto to add to the dish. (Note: Imported is so much better than the Domestic.) Then I went to the local grocery store and bought fresh, grated Parmigiano cheese and went home to make this meal. Here's the recipe link: Alfredo Sauce Recipe.
I cut up the proscuitto and cooked it and the peas separately because you don't actually cook the sauce. The secret to cooking proscuitto is to not cook it too long because it will dry out and be crunchy. Make sure you keep a careful watch on it. As soon as it's heated through, shut it off! (And, yes, I already knew this and did it right.)
Then I pulsed the room temp. butter and cheese in my food processor and waited for the noodles to be done. Look at how soft and fluffy it is!
Then I mixed it all together and got a great response from my husband and girls. Aubrey wanted 3 bowls and Angelina asked for another helping. Jeremy's response was, "Wow! This is amazing!" I think it was a hit! Look at how nicely it coats the noodles.
In short, this, my friends, is what separates the true Italians from the "I"-talians. (You know the want-to-bes who annoyingly pronouce it "eye"talian!) Who would have thought that there was such a science to a good Alfredo Sauce? Enjoy!
South of the Border
This meal has to be one of my favorites not only because it's so colorful, but also because it's so easy to make and has so many wonderful flavors!
This is my infamous Taco Chicken. Put taco seasoning in a ziplock bag. Place a piece of chicken in the bag and shake it until coated (like shake-n-bake) and then bake in the oven at 425 for 20 min. or until done. For the last 5 minutes, I put a jar of salsa over the chicken until the salsa is heated through. To serve top with shredded cheese (I use Monterey Jack), a dallop of sour cream, and sliced black olives. Serve with some rice, pico de gallo, and guacamole and you're done!
I make my guacamole very simply because I want to taste as much of the avocado without drowning it in other stuff. Mine consists of mashed avocado, 1 clove of fresh, pressed garlic, and juice from 1/2 of a lime. Mix until blended.
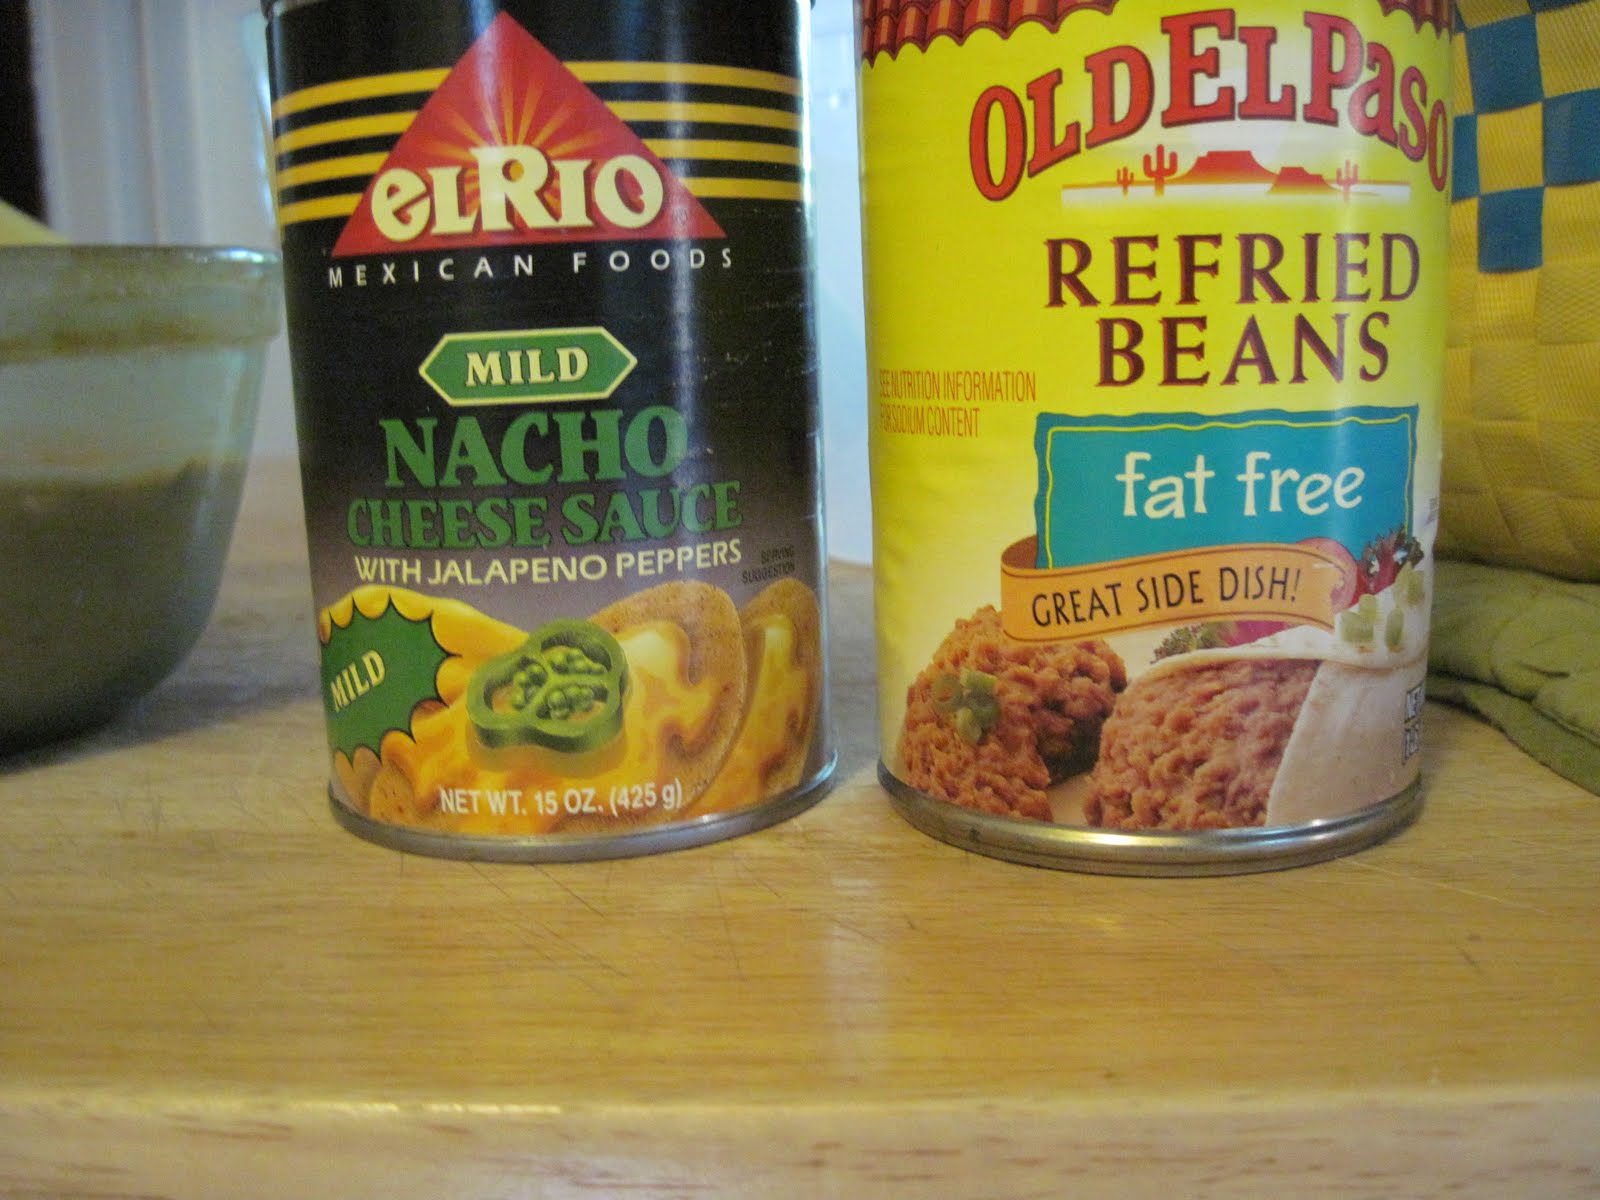
I also made bean and cheese dip - I know there is a name for this, but I can't think of it now. Anyway, it's not very diet friendly, but it sure tastes good with the tortilla chips with a hint of lime. I tried to at least help myself a little by getting the fat-free refried beans! I found this cheese sauce and just mixed it together with the beans and microwaved it until heated through.
I asked the girls to help set the table that night. I came out to find them so proud of themselves because they made a Mickey Mouse out of the plates and silverware. You never know what you're going to get when you ask 4 yr. olds to help! You do get a good laugh sometimes though.
This is my infamous Taco Chicken. Put taco seasoning in a ziplock bag. Place a piece of chicken in the bag and shake it until coated (like shake-n-bake) and then bake in the oven at 425 for 20 min. or until done. For the last 5 minutes, I put a jar of salsa over the chicken until the salsa is heated through. To serve top with shredded cheese (I use Monterey Jack), a dallop of sour cream, and sliced black olives. Serve with some rice, pico de gallo, and guacamole and you're done!
I make my guacamole very simply because I want to taste as much of the avocado without drowning it in other stuff. Mine consists of mashed avocado, 1 clove of fresh, pressed garlic, and juice from 1/2 of a lime. Mix until blended.
I also made bean and cheese dip - I know there is a name for this, but I can't think of it now. Anyway, it's not very diet friendly, but it sure tastes good with the tortilla chips with a hint of lime. I tried to at least help myself a little by getting the fat-free refried beans! I found this cheese sauce and just mixed it together with the beans and microwaved it until heated through.
I asked the girls to help set the table that night. I came out to find them so proud of themselves because they made a Mickey Mouse out of the plates and silverware. You never know what you're going to get when you ask 4 yr. olds to help! You do get a good laugh sometimes though.
Friday, June 25, 2010
Here's a Delicious Meal
This is one of my favorite meals: Mediterranean Chicken and Braised Lentils. These flavor combinations make for an eater's paradise! The nice thing about this menu is that it is fairly inexpensive to make but tastes like a million bucks!
I just made Chocolate Ricotta Mousse the other night. It is super easy and oh, so good! It literally took me about 5 minutes to make.
Just a quick tip: Melt the chocolate in the microwave (use glass - chocolate gets really hot and will melt your plastic and in turn burn you) in 30 second intervals until melted.
I just made Chocolate Ricotta Mousse the other night. It is super easy and oh, so good! It literally took me about 5 minutes to make.
Just a quick tip: Melt the chocolate in the microwave (use glass - chocolate gets really hot and will melt your plastic and in turn burn you) in 30 second intervals until melted.
Breakfast for Dinner
Some nights you just want something easy and hearty for dinner and this recipe did not fail to please. Yes, the entire family liked it! I made a few substitutions based on what I had available, but it was very tasty. This is called The Eggberts Sunriser from Pioneer Woman. She has a really great site if you need some recipe ideas.
Here was our version. I like my eggs over-easy.
I made the girls' portions with scrambles eggs, since they're not big fans over over-easy yet.
Here was our version. I like my eggs over-easy.
I made the girls' portions with scrambles eggs, since they're not big fans over over-easy yet.
Then I made breakfast for breakfast! Doesn't this look good? Homemade blueberry muffins with fresh strawberries and raspberries. I forgot to include the butter in the recipe, so it was even less fattening than the original recipe. Also, I only used 3/4 cup of the yogurt because I ran out. I finished the cup with homemade applesauce. They turned out great! (That butter is only 1 tsp. even though it looks like alot!)
I'm still here and cooking...
Well, April proved to be a whirlwind starting with my husband getting laid-off and then a trip to NC for a long weekend turned into a week long visit due to my Dad having emergency surgery upon our arrival. Then 2 weeks after getting home we had to return for my Grandmother's funeral. One thing my Grandma and I held in common was our love to cook. She was an amazing Italian cook. I'll have to pull out some of her recipes and share them sometime (at least the ones that I haven't been sworn to secrecy with!). So, then May and June have flown by and my sister just reminded me that I really need to post again.
I have been cooking some pretty good stuff - here's some of it:
Here is a London Broil that I marinated in my favorite recipe from the first cookbook that I ever owned - given to me by my Grandma, Bon Appetit, Entertaining with Style. The recipe calls for flank steak, but I found that a London Broil does well too, is less expensive, and is nice and thick and tender.
Marinade Recipe - Grilled Flank Steak with Rosemary
Marinate the meat overnight for the best flavor:
I served this with baked potatoes, fresh fruit salad, and a tossed salad. My fruit salad was so good. It was cut up fresh pineapple, mangoes, strawberries, & blueberries. It really hit the spot!
My tossed salad included cucumbers that I learned a neat, little trick years ago from my Uncle (another amazing, Italian chef). Just slide fork prongs down the skin of the cucumber and then slice. They look really cool and the skin isn't as tough. This way you're getting all the vitamins the cucumber has to offer!
I have been cooking some pretty good stuff - here's some of it:
Here is a London Broil that I marinated in my favorite recipe from the first cookbook that I ever owned - given to me by my Grandma, Bon Appetit, Entertaining with Style. The recipe calls for flank steak, but I found that a London Broil does well too, is less expensive, and is nice and thick and tender.
Marinade Recipe - Grilled Flank Steak with Rosemary
Marinate the meat overnight for the best flavor:
I served this with baked potatoes, fresh fruit salad, and a tossed salad. My fruit salad was so good. It was cut up fresh pineapple, mangoes, strawberries, & blueberries. It really hit the spot!
My tossed salad included cucumbers that I learned a neat, little trick years ago from my Uncle (another amazing, Italian chef). Just slide fork prongs down the skin of the cucumber and then slice. They look really cool and the skin isn't as tough. This way you're getting all the vitamins the cucumber has to offer!
Subscribe to:
Posts (Atom)